2010 Camaro SS LS3 Cam Install
My 2010 Camaro just turned 1 year old, so I figured that I should get it a birthday present! With all of the basic bolt-on mods already installed, the next logical step is to install a larger camshaft. After scouring the internet for hours on end researching different cams and watching endless Youtube videos, I decided to install a Jannetty Racing Super Street 470HP Blower Cam.
Day 1 – 4 hours
Before I even get started I would like to thank robertway over at camaro5.com for putting together one of the most comprehensive DIY write-ups for installing a cam in an LS3! I will be using his write-up as a guide for my install.
Alright let’s get on with it!
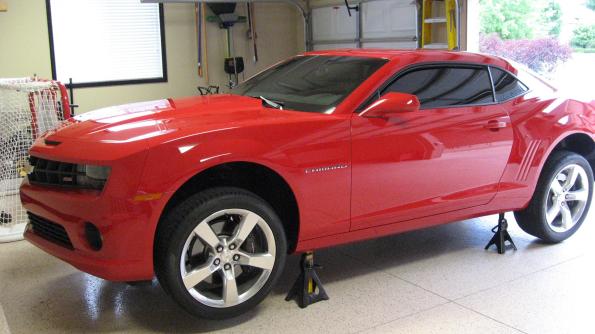
First get the car on jack stands
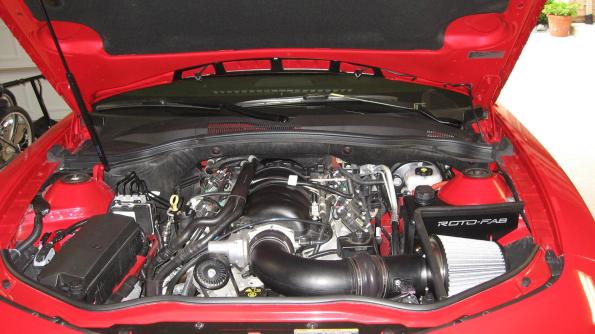
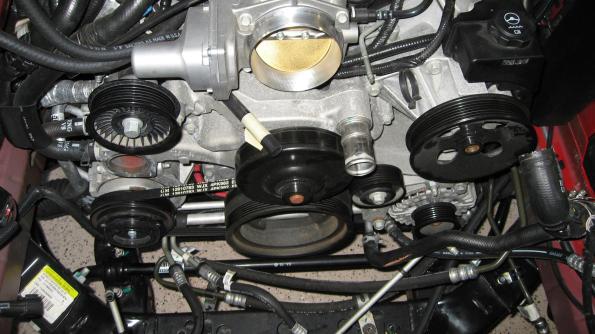
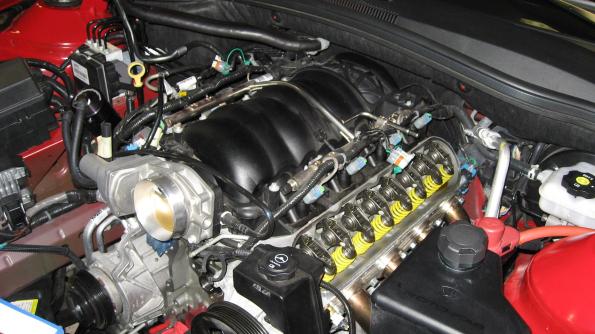
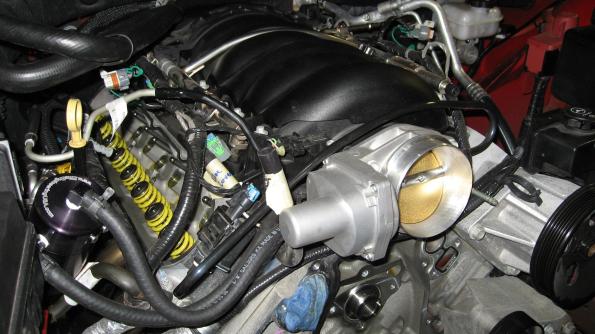
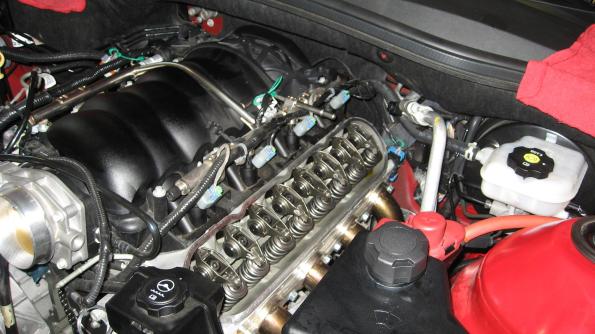
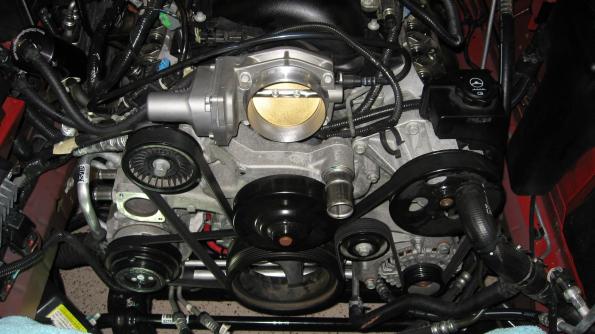
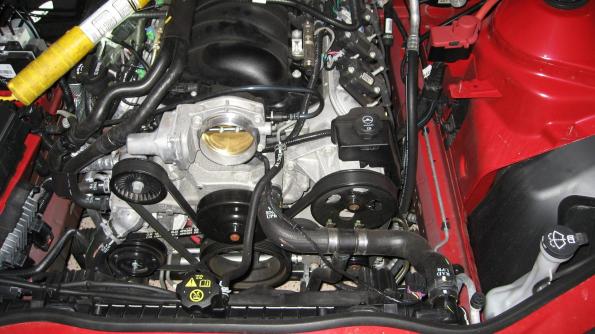
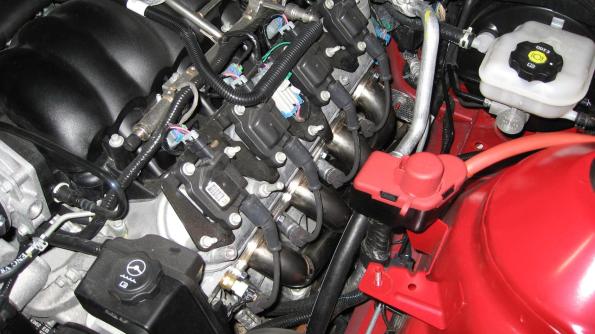
Engine compartment before getting started
Drain oil from oil pan, replace oil filter
Drain coolant from radiator
Remove spark plugs and wires
Remove cold air intake system

Remove all radiator hoses
Remove electric fans
Remove lines from transmission cooler
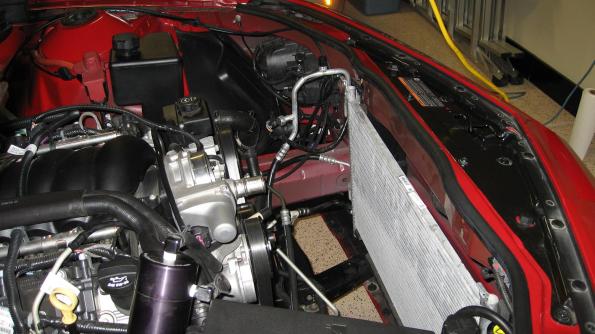
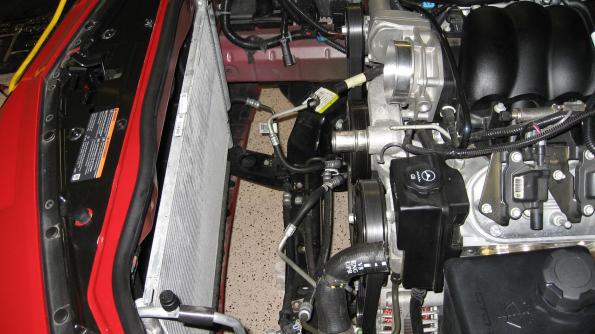
Remove radiator
Clean up mess of oil, coolant and transmission fluid on the garage floor
Day 2 – 2 Hours
Unbolt A/C and transmission line brackets from cross member
Remove serpentine belt
Remove A/C belt
Remove crank bolt by heating with a torch for about 10-15 seconds, then use a 24mm socket and a big ass breaker bar to crack it loose
Using a harmonic balancer puller, remove harmonic balancer from crankshaft
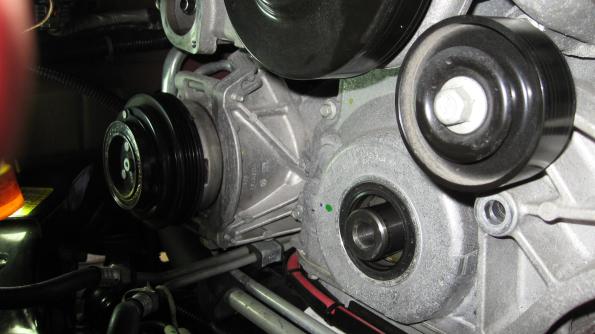
Remove water pump
Remove all oil pan bolts
Remove bolts holding the battery cable tray to the block
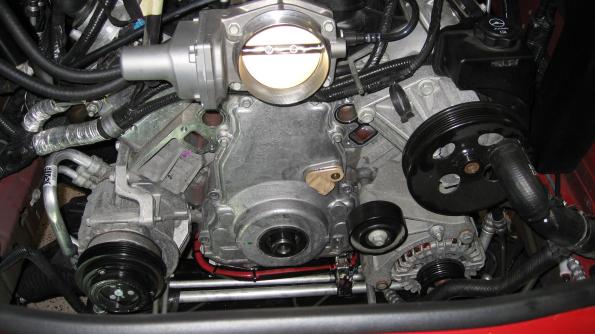
Remove timing cover bolts and remove timing cover
Day 3 – 3.5 Hours
Drop oil pan and remove oil pump
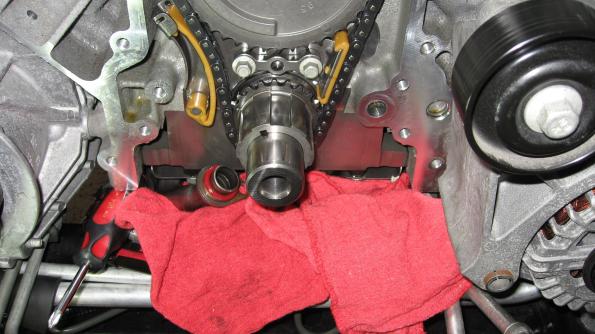
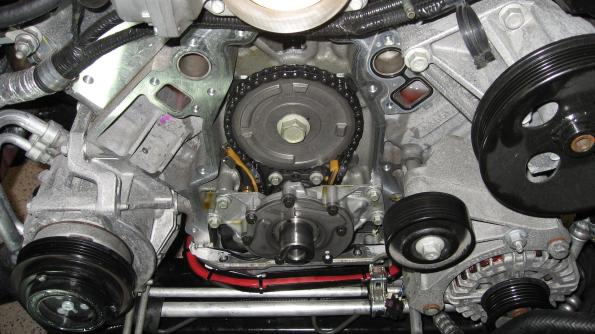
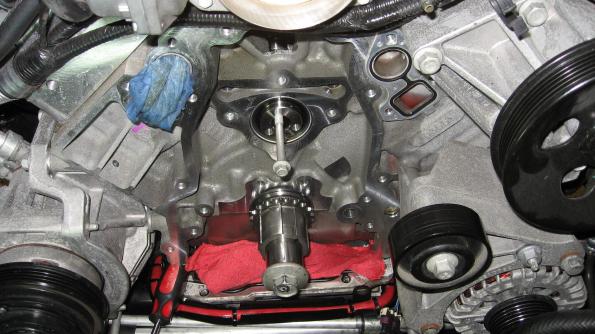
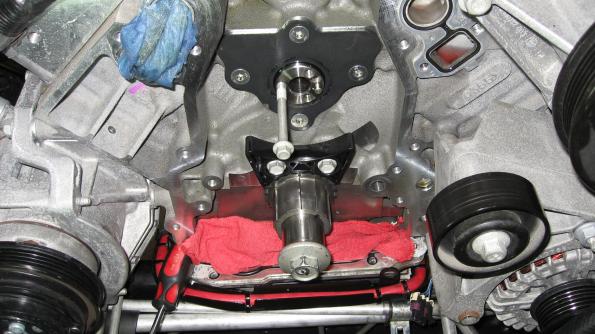
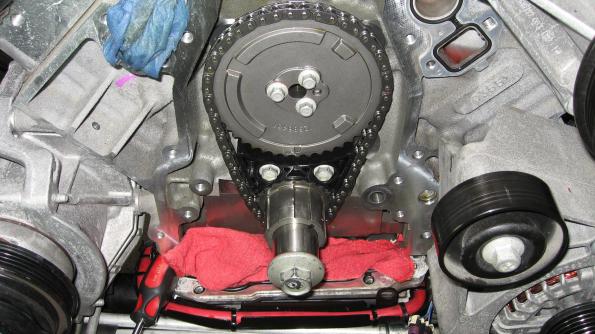
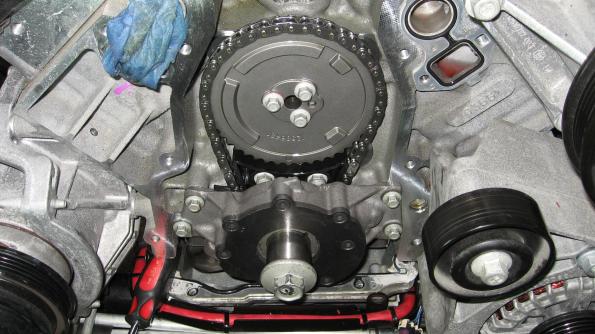
Align cam and crank sprockets with the dots at 6 and 12 o’clock
Remove timing chain tensioner
Remove cam/sprocket bolt
Remove timing chain
Remove cam retainer plate
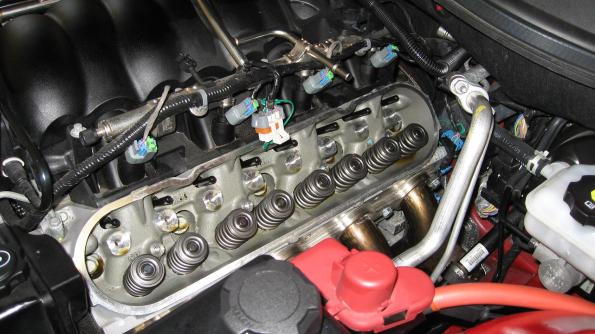
Remove coil packs from both valve covers
Remove both valve covers
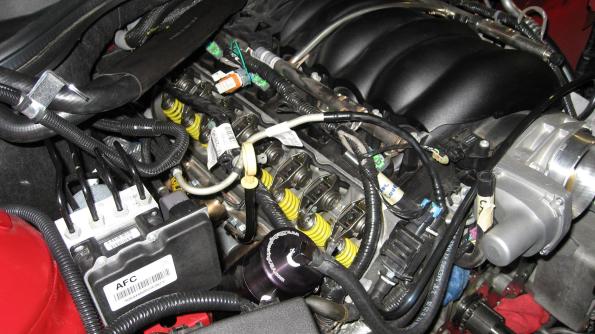
Remove all rockers arms
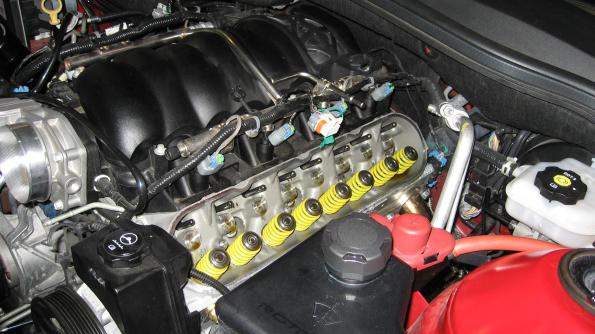
Remove all pushrods
Pull A/C condenser out of the way and secure to hood latch with bungee cord
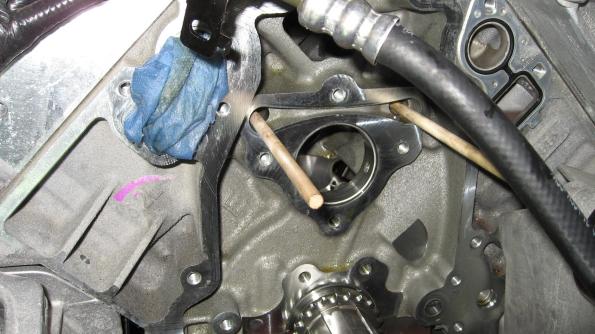
Insert 2 – 5/16″ X 24″ wood dowels into the lifter valley to prevent the lifters from dropping when removing the camshaft
Insert stock cam bolt into stock camshaft about halfway
Very carefully remove stock camshaft
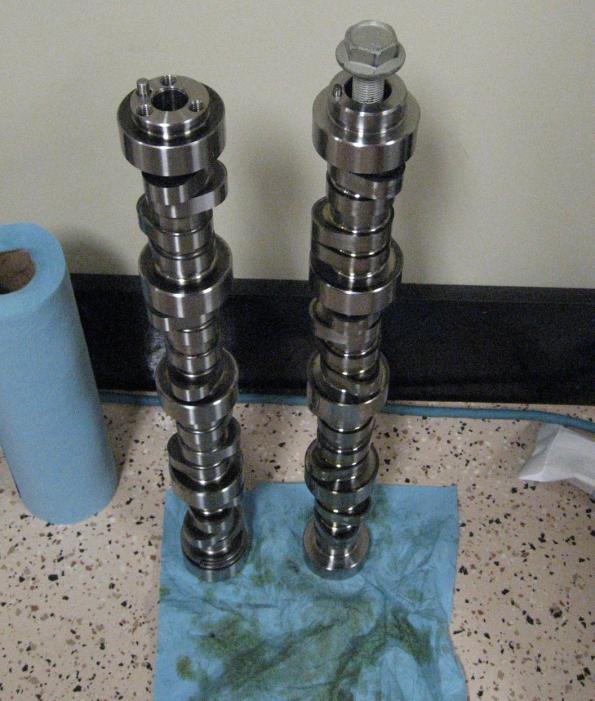
Here is the new 3 bolt Comp Cams camshaft vs. the stock camshaft
Generously coat the new camshaft with synthetic motor oil, or cam lube
Partially thread three water pump bolts into the new camshaft
Very carefully, insert the new camshaft into the engine block, paying close attention not to let the cam score the bearings
Once the cam is fully inserted, remove 2 of the 3 water pump bolts
Day 4 – 3 hours
Install cam retainer plate
Install LS2 style timing chain dampner/snubber
Dip new Katech C5R timing chain into oil and place over new cam sprocket
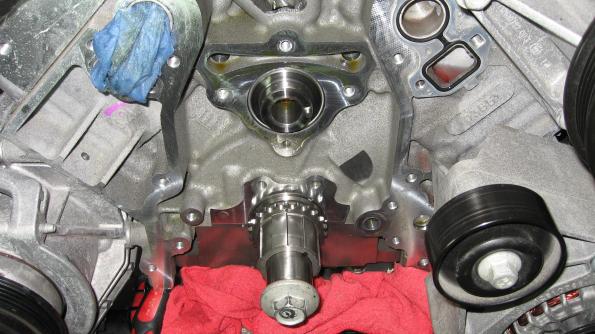
Install new timing chain and cam sprocket with the dots at 6 and 12 o’clock
Install new Melling oil pump carefully paying attention to not to tear the o-ring on the pickup tube
Check and double check that the pickup tube to oil pump connection is sealed properly. It should look like this when assembled
Install the pickup tube to oil pump bolt
Remove factory installed RTV sealant from oil pan gasket
Install oil pan and starter, torque all fastners
Day 5 – 4 Hours
On to the valvetrain…
Ensure that piston is at TDC for the cylinder that you are working so that the valves don’t drop into the block
Using a Crane Cams valve spring compressor tool compress two valve springs at a time

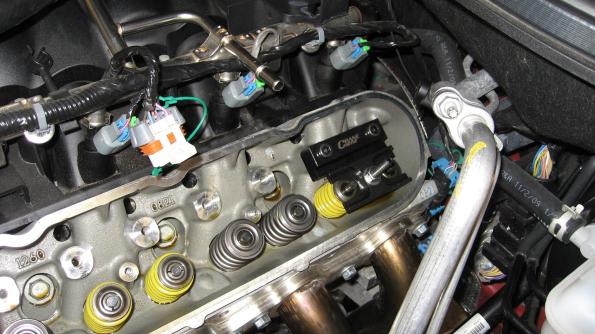
Remove valve locks, retainers and valve springs
Using pliers, remove the combination valve spring seats/valve seals
Install new spring seats
Install new valve seals
Install new dual valve spring, retainer and locks
Repeat this process for each cylinder (It is a rocking good time!)
Once all the valve springs have been replaced, install new hardened pushrods and rocker arms one cylinder at a time
Day 6 – 4 Hours
Punch out crank seal on timing cover and replace with a new seal

Install timing cover

Install harmonic balancer (Major PITA)
Reconnect battery cable tray to bottom of block
Install water pump
Install A/C and serpentine belts
Install rocker covers
Install coil packs
Install spark plugs
I decided to install a Katech heater hose relocation kit to get the heater hoses off the top of the intake manifold (another PITA). This kit re-routes the heater hoses to clean up the engine, and gets the hot hoses off of the intake manifold.
Since I lost about a quart of transmission fluid when disconnecting the lines from the cooler, I figured now would be a good time to drain the remaining fluid from the transmission and change it over to synthetic fluid.

Day 7 – 2 Hours
Install radiator, connect all hoses/lines
Install E-Fans
Fill transmission with 4 quarts of Mobil 1 synthetic ATF
Fill engine with 7 additional quarts of Mobil 1 oil
Fill radiator with 50/50 Dexcool Antifreez/Coolant
Install cold air intake
Check all fuel lines, PCV hoses, electrical connections, etc. under the hood
Crank engine over several times for 15-20 seconds with spark plugs disconnected to circulate oil through engine and build oil pressure
Connect spark plug wires
Say a prayer, start engine!
The results:
MCITP Boot Camp
So I decided it was time to expand my IT skill set and get some formal Microsoft training (and hopefully a few certifications in the process). I chose to enroll in a CED Solutions MCITP triple certification boot camp held just outside of Atlanta Georgia. I figured that this would be the most time efficient method to obtain multiple certifications. The boot camp consists of an intense 15 days of classroom lecture and hands on labs, combined with 3-5 hours of study time every night. The three MCITP certifications that I am going for are as follows: Enterprise Desktop Administrator 7, Windows Server Administrator, and Windows Enterprise Administrator. In order to obtain all three certifications, a total of 7 exams are required, which will be taken throughout the course of the boot camp.
I arrived in Atlanta on Friday March 4th and checked in to my hotel. The weather is about 25 degrees warmer here than at home so that is a bonus! Class is set to begin at 8 am the following Saturday morning. There was a two hour introduction/orientation of how the program works, followed by lunch. After lunch the fun began…
First up is preparation for exam 70-680 Configuring Windows 7. 4 hours of lecture, followed by 4 hours of study time. It was an exciting Saturday night…. Sunday is the light day. Class starts at 12:30pm and ends at 5:00pm. Another 4 hours of group study followed. Monday (first exam day) 6 hours of class time, 1 hour of study time, then test time! I was surprised that the test took less than 30 minutes to complete. There were 50 questions. The minimum score to pass a Microsoft test is 700, 1000 is the highest score possible. I scored a 1000! Let’s just say that this wasn’t the toughest test that I have ever taken, but I guess it is a good idea to start off easy to build your confidence. This warrants a celebration! A few of us went out for a couple of drinks, before hitting the books again.
With the first test completed it is time to concentrate on the material for exam 70-686 Windows 7 Enterprise Administrator. The material for this exam is quite a bit more difficult. I put in a couple of hours of review before calling it a night. Class for Tuesday and Wednesday are scheduled to be half days. This will allow for plenty of study time to get ready for the next test. I put in 6 hours of study time on Tuesday, and another 2 hours on Wednesday.
I was able to take the 70-686 exam a couple of hours early on Wednesday. I felt very prepared and confident. I was able to breeze through the test with another perfect score of 1000! I am now a MCITP for Windows 7 Enterprise Administration! Two exams down, five more to go!
Now that the desktop OS material is covered, it is time to get into the server side of things. This material is far more difficult and involved. This is the meat and potatoes of the boot camp right here! I put in a couple of hours of study time Wednesday. My brain feels like mush!
Time to start preparing for the 70-640 exam Configuring Active Directory. This consisted of a healthy 9 hours of classroom time followed by 4 hours of studying on both Thursday and Friday. Can you say stressful? I don’t even want to know what my blood pressure is right now… Saturday morning brought a final review; test time is at 2:00pm. Wow, this was one of the most difficult tests I have ever taken. I managed to score an 868 which is well above the minimum passing score of 700! I feel very fortunate, 7 people out of 20 people in our class failed this exam. Time to go out and relieve some stress! Several of us went out for a night on the town for a well-deserved celebration. Studying this night consisted of Miller Light and Jagermeister!
The 70-642 exam is up next, Configuring a Network Infrastructure. I hope to God that this test is easier than the last one, I don’t know if I can put my brain and body through that amount of stress again! 5 hours of class on Sunday, followed by 3 hours of study time. A brutal 9 hours of class time on Monday followed by 5 hours of studying. Tuesday is test day again. I spent a couple of hours reviewing and preparing in the morning. I was able to test early at 1:15pm. BOOM, I scored a 950! Thankfully this test was easier than the last one. I can now see the light at the end of the tunnel with 4 exams complete, and only 3 more remaining!
Next up is exam 70-646 Windows Server 2008 Administration. I put in a solid 4 hours of study time on Tuesday. Class time for Wednesday was only 6 hours, so I was able to get an early start on 4 more hours of studying for the exam…. Thursday is a half day of class, followed by a final review, and then the test. The format of this exam is different that all of the others so far. You are presented with a fictitious company and are tasked with designing a solution that meets the company’s goals. After these 5 scenarios, I had an additional 22 questions. I scored a 929! Whoohooo, 5th exam passed, I just earned an MCITP for Windows Server Administrator. Only two more exams to go, yea!
No time for a celebration just yet. The two final exams are back to back, starting tomorrow. I have to get ready for exam 70-643 Windows Server 2008 Applications Infrastructure, Configuring next. I put in a brutal 6 hours of study time Thursday night, who needs sleep? Fridays lecture lasted until just past lunch time, which left time for a very short review. I started looking at the practice test and all of the words and terms were starting to blend together, my brain feels like it is starting to shut down! I said screw the review; let me get this damn test over with. To my astonishment I did surprisingly well, I scored a 904! Six exams down, only one more remaining. Time to take a short dinner break before studying for the final exam which is tomorrow.
After a quick dinner, I put in 5 hours of study time on Friday night to prepare for the final test which is exam 70-647 Windows Server 2008, Enterprise Administrator. I woke up Saturday morning feeling both mentally and physically exhausted. As of now I do not feel prepared to take this final exam. The material is very difficult, and my brain is fried. I have time for a couple hours of review before taking the test. After about two and a half hours I couldn’t take any more, at this point I am incapable of absorbing any additional information. I took a short break for lunch, and then it was test time for the final time… This test was very difficult, combined with the fact that I have been going at this for two weeks. When I finished the test, I just sat looking at the monitor with a blank stare on my face waiting for my score to be calculated. At this point, I just want to be finished, I can’t take it any longer, and then the screen lights up “Congratulations you have passed this exam, the minimum score to pass is 700, your score was 718”. Wow, I just barely squeaked by, but none the less I passed!
So that was it, two weeks of hell was over and I earned a total ten Microsoft certifications. Seven Microsoft Certified Technical Specialist (MCTS) certifications as well as three Microsoft Certified IT Professional (MCITP) certifications. I have to say that this boot camp was one of the most difficult things that I have accomplished in my lifetime. I would like to thank my employer RoMan Engineering Services for making this possible for me. Now I am ready for a vacation J
Windows 7 and Windows Server 2008R2 Service Pack 1 SP1 Released!
Today, Microsoft has made Service Pack 1 for Windows 7 and Windows Server 2008R2 available to current customers of the Windows Volume Licensing program, as well as subscribers to Microsoft Developer Network (MSDN) and TechNet. SP1 contains all cumulative security updates to date, as well as several hotfixes.
Here are the benefits of Service Pack 1 according to the Microsoft Windows Server Division Weblog:
Two new features in Windows Server SP1, Dynamic Memory and RemoteFX, enable sophisticated desktop virtualization capabilities. These features build on the comprehensive virtualization functionality already included in the Windows Server operating system.
Our first new feature, Dynamic Memory, takes Windows Server’s Hyper-V feature to a whole new level. Dynamic Memory lets you increase virtual machine density with the resources you already have—without sacrificing performance or scalability. In our lab testing, with Windows 7 SP1 as the guest operating system in a Virtual Desktop Infrastructure (VDI) scenario, we have seen a 40% increase in density from Windows Server 2008 R2 RTM to SP1. We achieved this increase simply by enabling Dynamic Memory.
This increased density does not come at the expense of security, as is the case with other offerings in the industry. Dynamic Memory preserves Windows 7 security without compromising density. My colleague Jeff Woolsey goes into detail in a recent post on this topic at the virtualization blog.
In addition, you get immediate benefit from the moment you turn on the virtual machine. There’s no waiting for memory management algorithms to work. Nor do you have to tweak the hypervisor with custom settings for specific workloads to maximize density. It’s an awesome out-of-box experience for all your virtualization workloads.
The second new feature, RemoteFX, is a first-to-market technology that we have demonstrated at multiple events. In fact, I was honored to be the first to show it publically at the Desktop Virtualization Hour last March.
RemoteFX is an exciting technology that lets you virtualize the Graphical Processing Unit (GPU) on the server side and deliver next-generation rich media and 3D user experiences for VDI. RemoteFX is also enabling new low cost ultra-thin client devices to enter the market. Together, these technologies will drive down the end-point cost and reduce endpoint power consumption to as little as a few watts.
Log in to your account and go get it!
Reboot Script for Exchange Server
Sometimes rebooting your Exchange server can be a painful experience. Common issues are: very long time to shut down or boot up the server after a restart, or the database goes into a “dirty shutdown” state.
Here is a simple script that should alleviate these issues (create a new .bat file and paste these commands into it):
net stop FSCController /y
net stop MSExchangeADTopology /y
net stop MSExchangeIS
shutdown /t 0 /r
After creating the .bat file just double click it and the Forefront and Exchange services will be gracefully stopped and the server will reboot.
Enjoy!
Boot Image Recovery on a Cisco ASA Firewall
I was performing some basic maintenance on a Cisco ASA5510 firewall. When I was finished performing the maintenance I proceeded to reload the device. Next thing you know the firewall went into a boot loop, not good! So I hooked up a console cable to figure out what was going on. It appears that somehow my software image had become corrupted and the ASA would not boot.
I was getting the following error message:
Error 15: File not found
Unable to boot an image
So I fired up the WiFi hotspot on my Motorola Droid and proceeded to download the appropriate software image from the Cisco Support website.
Here are the required steps to recover from a missing or corrupt boot image:
- Connect a console cable from the ASA to your computer and open up a serial connection using Putty
- Disable any software firewall on your computer
- Install TFTP server software on your computer – I used Solarwinds TFTP server
- Place the Cisco software image in the TFTP-Root folder (asa821-k8.bin) and start the TFTP service
- Assign a static IP address to your computer – I used 192.168.20.1 (an address outside of my existing subnet)
- Connect an Ethernet cable between your computer and port 0/0 on the ASA
- Power off the ASA then power it back on
- Press the escape key to boot into ROMMON mode
-
Enter the following commands in the ASA (the first part of these commands must be in caps)
rommon #1> ADDRESS=192.168.20.10
rommon #2> SERVER=192.168.20.1
rommon #3> GATEWAY=192.168.20.1
rommon #4> IMAGE=asa821-k8.bin
rommon #5> PORT=Ethernet0/0 - These commands assign an IP address of 192.168.20.10 to port 0/0 on the ASA and tell it to look at your TFTP server 192.168.20.1 and to select the ASA software image.
-
Next, execute the command to transfer the image from the TFTP server to the ASA
rommon #6> tftp
Once the file transfer completes reboot the ASA and cross your fingers. If everything works the device should successfully reload and your existing configuration should remain intact.
2010 Camaro SS Cold Air Intake & Long Tube Header Installation
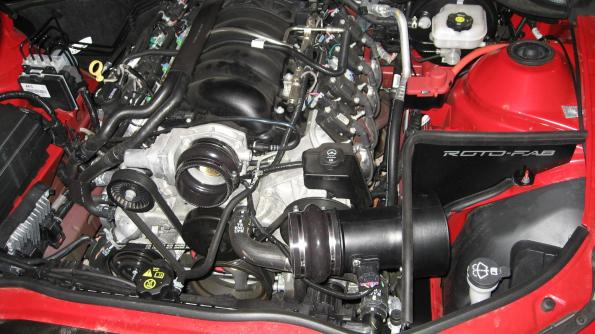
Now that the Camaro is almost a week old, I figured it is never too soon for additional horsepower, right? For the first round of mods I chose to install a Roto-Fab cold air intake system (CAI), and a set of Kooks long tube headers. I followed the rule that if you allow your engine to breathe easier it will better produce more power. The LS3 is no exception to this rule.
I decided to install the CAI first. This is about the easiest mod that one can perform; installation takes less than one hour to complete.
Here is a virgin photo

I have to give GM credit here. The engineers did what appears a pretty good job on this stock intake system. There are no severe bends or restrictions at all, and the lower part of the air filter housing contains a large port to suck in cold air. I was beginning to wonder if I would see any gains by installing the Roto-Fab setup. After reading several forums, and looking at dyno test results for the Roto-Fab, people are seeing peak gains of 15 hp and 11.7 ft/lb torque. The average hp and torque gains were 11hp and 11 ft/lb across the RPM range….sold!
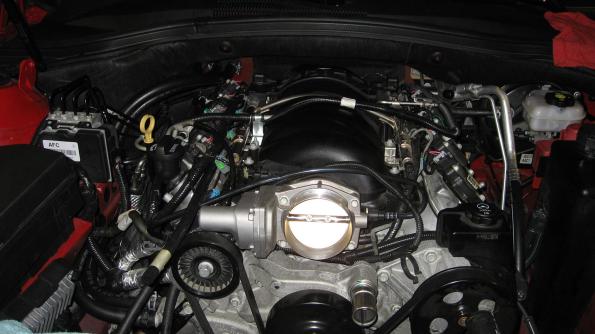
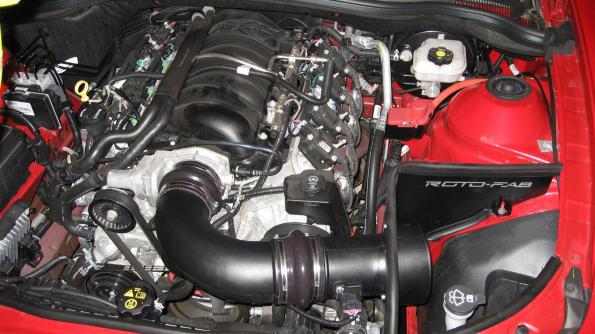
Here is the engine with the factory air intake system removed
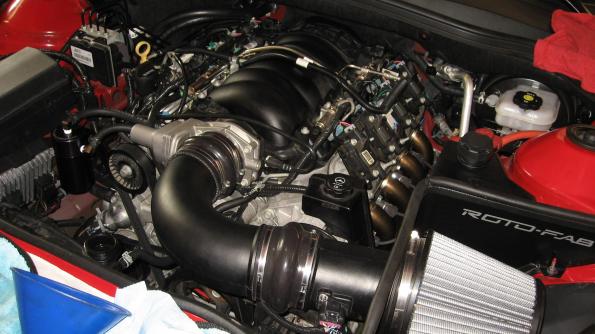
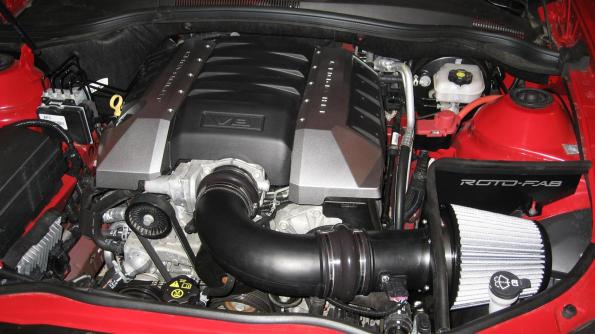
Now for installation of the Roto-Fab system
Finished!
Now for the more difficult of the two mods, the Kooks long tube header installation. I won’t go into all of the details of installing these headers, but basically I followed the instructions found here: How To: Install Header System on a 2010 Camaro SS
Here are the stock exhaust manifolds/cats removed from the vehicle
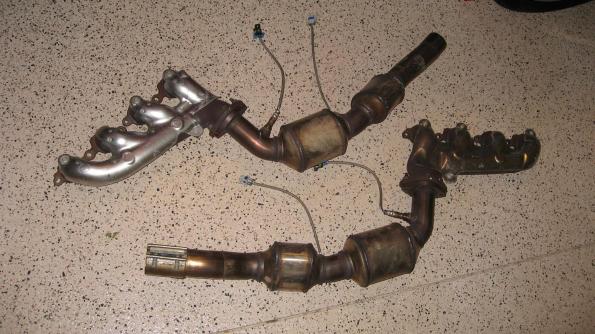
Here is a side by side – Stock vs. the Kooks long tube header with off-road connection pipe
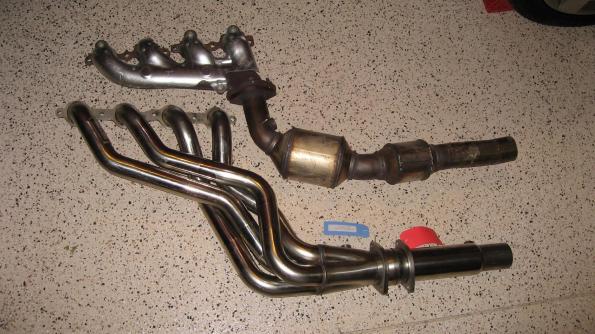
The overall length of the Kooks header with off-road connection pipe is the exact same as the stock setup. This allows you to bolt right up to the factory exhaust (which I did) or install an aftermarket exhaust with no cutting or welding required. This setup removes the catalytic converters from the exhaust system, so custom programing of the PCM is necessary to tell the computer to not to set a check engine light due to the missing cats. Even if you choose to go with the catted version of these headers, a custom tune is required to allow you to utilize the full potential of these headers.
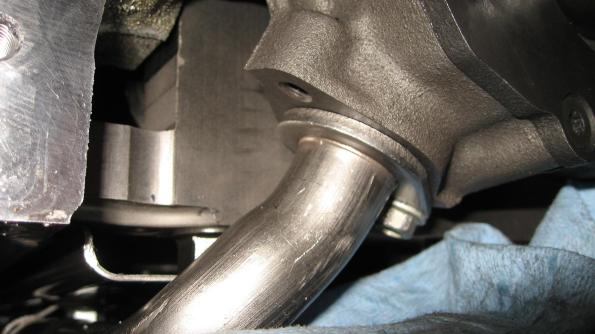
Here is a photo of the driver side header installed
Conclusion:
This combination of CAI, headers, and custom tuning is good for about 50 RWHP! At idle and when cruising, you can hardly tell the difference in the sound of the exhaust. However when you mash the go pedal it becomes apparent that the headers are installed, the exhaust comes alive. As for a cat back exhaust, I am probably going to stick with the stock setup for now. You get 2.5″ true dual exhaust with an H pipe from the factory. Adding an aftermarket cat back exhaust only adds 5-10 additional horsepower, but makes the exhaust considerably louder. I kind of like the sleeper factor with the stock setup anyway!
2010 Camaro SS
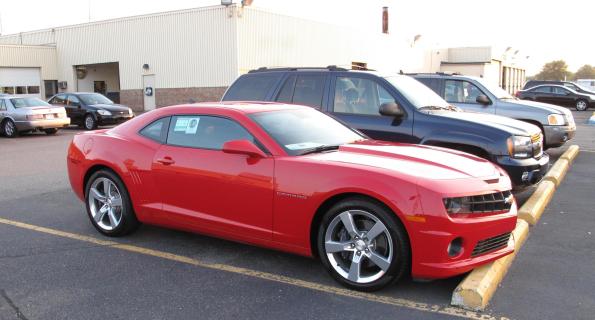
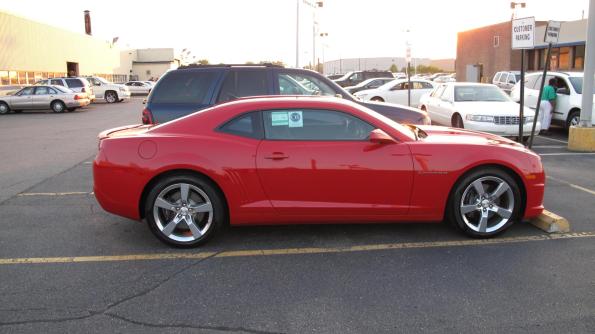
On Monday July 26th, I took delivery of my 2010 Camaro! My original plan was to wait until spring 2011 to purchase, but GM was closing out the 2010’s and I couldn’t pass up the price. My only requirement was that the car had a manual transmission. There were only two 2010’s with manual transmissions left in the region; both of those vehicles were red, so I got red!
Here are the details:
2010 Camaro 1SS Base package
RS Package – adds body color roof ditch moldings, HID headlamps, and RS unique tail lamps
Polished 20″ Aluminum Wheels
Boston Acoustics sound system – this needs serious improvement… I’m sure that this will be the topic of several blog posts in the future
The car drives and feels great. The six speed manual feels good with relatively smooth shifts. Wow it feels good to drive a stick again! I have been taking it easy trying to break the vehicle in properly – this is no easy task! Look for posts in the future to see what progress has been made on the car.
Guest Wireless Access Using a Cisco ASA 5505 with VLAN Configuration
In my last post here I showed the procedure on how to enable guest internet access by creating a vlan with a Cisco ASA 5510 firewall. To accomplish the same setup using a Cisco ASA 5505 there are some differences in how the guest interface and vlan are created within the Cisco firewall. Also, there is a very important prerequisite; you must have the Security Plus License for the ASA 5505 to enable vlan trunking. All other aspects of the procedure are the same.
To create the Guest-VLAN interface in the ASA 5505 you need to use the command line interface (CLI). The first step is to establish a connection to the ASA 5505 using a Cisco RJ-45 to DB9 console cable or IP telnet session. Using a program such as PUTTY, open a serial or telnet connection to the ASA 5505. Enter enable mode by typing “en”, you will be prompted for the enable password.
Here are the necessary commands with comments:
# enter configuration mode
conf t
#create the new vlan
int vlan3
#give the interface a name
nameif Guest-VLAN
#assign a security level lower than that of your internal LAN
security-level 10
#assign the interface an ip address
ip address 10.0.1.0 255.255.255.0
#enable the interface
no shutdown
#exit interface configuration
exit
#access the physical interface that your LAN is connected
int Ethernet0/1
#define the vlans that the interface will allow (vlans 1 & 3 in this case)
switchport trunk allowed vlan 1 3
#define the native vlan
switchport trunk native vlan 1
#change the interface from access mode to trunk mode (this allows multiple vlans (security plus license required))
switchport mode trunk
#enable the interface
no shutdown
That’s it for the configuration on the ASA 5505! The rest of the procedure is the same as this post Guest Wireless Access Using a Cisco ASA 5510 with VLAN Configuration
Guest Wireless Access Using a Cisco ASA 5510 with VLAN Configuration
I wanted to setup a guest wireless network at my work so that guests had internet access, but no access to our internal LAN. This was accomplished using our Cisco ASA 5510 firewall, HP Procurve switch, Netgear wireless access points, and the creation of a vlan.
Here are the steps that I took to make this work:
First, login to the Cisco ASA firewall using ASDM. Go into the configuration, under device setup drill down to Interfaces. Add a new interface, give it a name, assign it a VLAN ID, security level lower than that of our internal LAN, and assign an ip address. Setting the VLAN ID to 3, identifies or “tags” the vlan using the 802.1Q protocol.

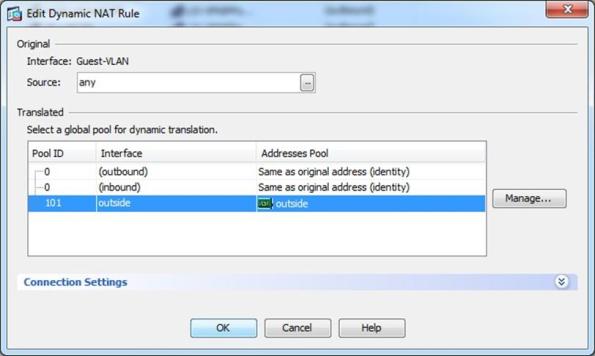
Next, go to Firewall configuration and drill down to NAT Rules. Create a dynamic NAT rule for the Guest-VLAN interface to use the ip address of the outside interface. Without this dynamic NAT rule, users will not be able to get to the internet.
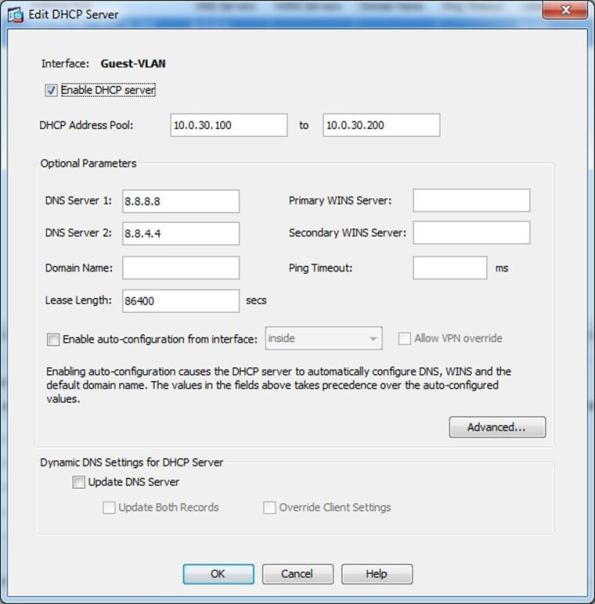
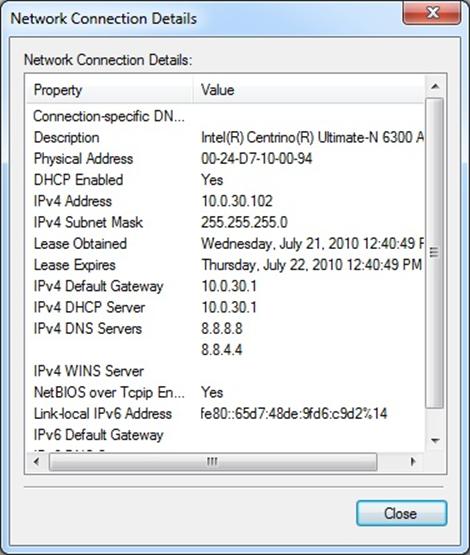
Next, go to Device Management and drill down to DHCP Server. I enabled the DHCP server on the Guest-VLAN interface and created an ip address pool, assigned Google Public DNS servers for DNS Servers 1 and 2. Then I setup the lease length for 1 day (86400 seconds).
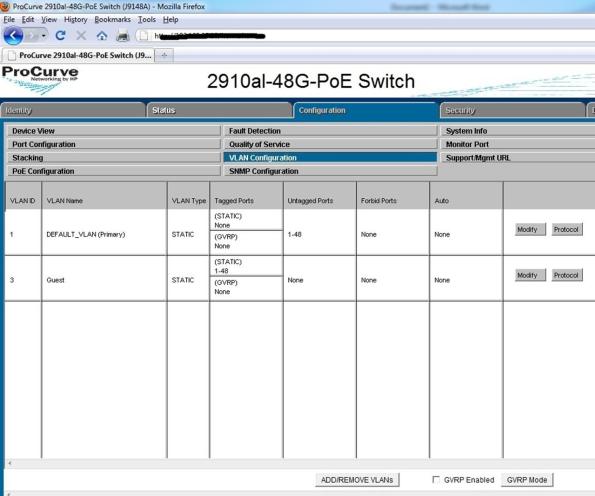
That is it for the configuration on the Cisco ASA. Next, I logged into our Layer 3 HP switch and created the Guest VLAN, assigned it with VLAN ID 3 to match the VLAN ID of the Cisco ASA. I tagged all ports with the newly created Guest VLAN.
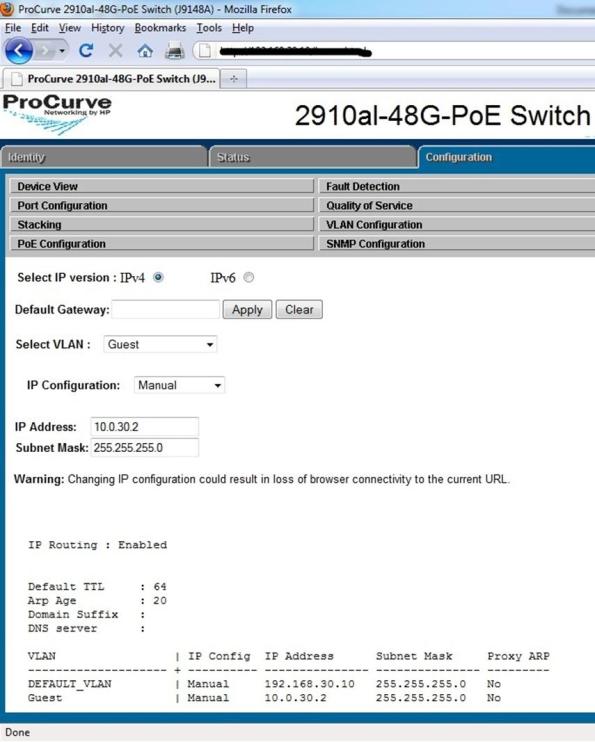
Next you have to assign the HP Switch an ip address to match the subnet of the newly created VLAN.
Finally, I logged into our Netgear wireless access points, created a Guest wireless SSID, applied WPA2 security and configured the VLAN ID to 3
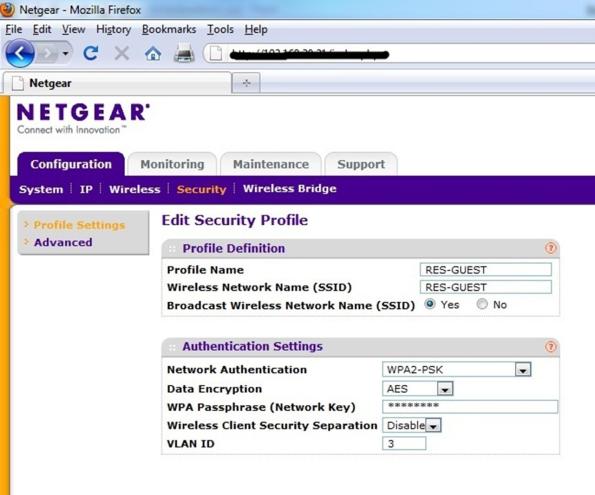
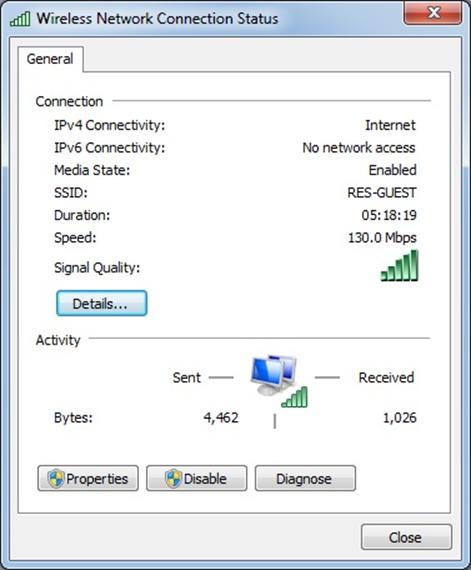
Now when guests logon to the RES-GUEST SSID they receive an ip address from the Cisco ASA DHCP server on the Guest-VLAN interface and can browse the internet, but can’t access our internal LAN.
Mission accomplished!
